Pages

Showing posts with label Gail Harker Center for the Creative Arts. Show all posts

Friday, May 17, 2013

Color Explorations & DWW #7

Welcome to Design Wall Weekend!   If you have a blog relating to quilting, fiber art, or related topics, please check out our rules and post your link below!

Photo of a gerber daisy I took today.
Today's been very exciting for me... I'm spending my birthday realizing a goal of mine- to be in the ongoing, long-term coursework at the Gail Harker Center for the Creative Arts.  I started in "Studies in Design, Experimental Machine and Hand Stitch Level 200" yesterday.

We mainly have been working on color theory and dyeing the last two days.  The photo above is a great example of color.  You probably know and can see how the complementary colors of blue and orange make this photo extremely vibrant.  But the photo also works well because it has red-orange, yellow-orange, yellow, and yellow green.  The spectrum of the color wheel from yellow-green through to red-orange are all included, which are analogous colors.  Also, the blue, red-orange, and yellow-orange combine to make a split-complementary theme.  Now, if the colors were all in the same proportionate amount, it wouldn't be nearly as effective.  but the dashes of yellow-green and red-orange really help the photo POP!
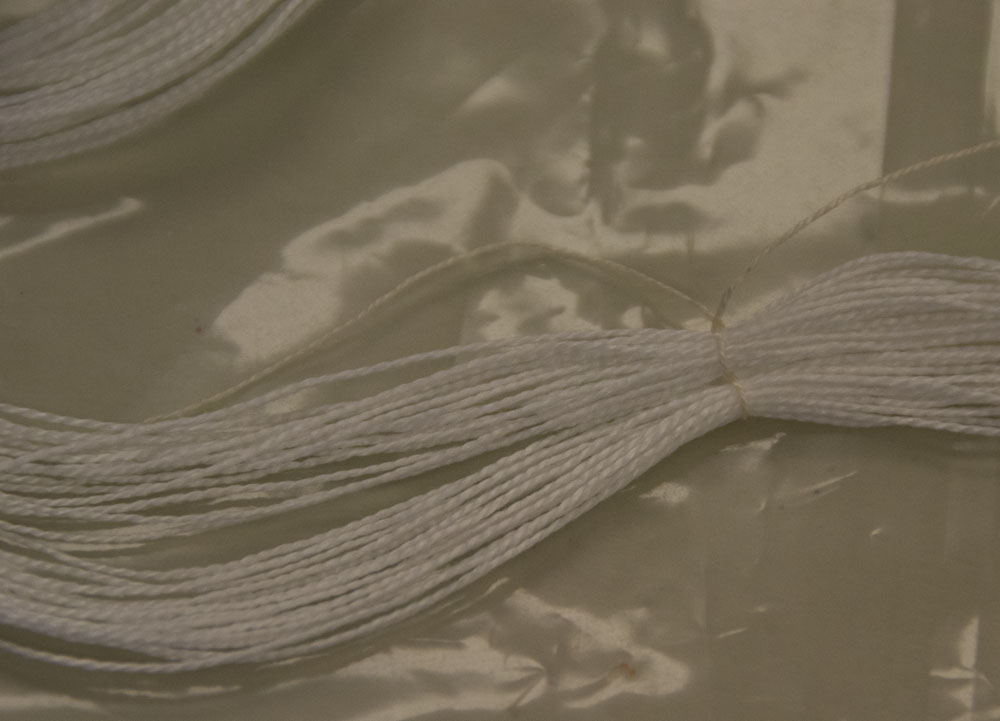
A few of my embroidery threads and yarns that I'm hand-dyeing.  The dye is wet on the thread here and will look different once it has been rinsed out.

Beyond playing with dyes on paper and practicing color schemes, we started hand-dying our thread today.  I played around with variegating between colors, from dark to light in one color, and with using a split-complementary color scheme on the thread.  
Some of my notes and a color study of creating neutrals from
complementary colors (Red-Orange and Blue-Green)
Tomorrow we will get started on dyeing our fabric and hopefully get to stitching.  I have three more wonderful days of this session... then it's home and off to set up the Tieton, WA "Salsa!" exhibition, which will be opening Memorial Day weekend.  I'm pretty confident that I'll be freemotion quilting as soon as I get through my show opening!

Design Wall Weekend #7 -- What do You Have on Your Design Wall?

What kind of blogs should link up?

I think that it's best to have content that matches the content and interests served with the blog that's hosting the party, so please only link up if your blog post is about any of the following:
  • Quilting and fabrics 
  • Fiber art of any kind
  • Hand & machine stitch or embroidery
  • Mixed media art
  • Book-making, art journals, and sketchbooks
  • Tutorials for any quilting, fiber, mixed media, sketchbook and other arts
  • These can be works in progress or finishes

From my sketchbook- Creating shades by adding black to a pure color (orange) and mixing a triad of
Yellow-Green, Yellow-Orange, and Violet

Rules for the blog linking party

  • Mention Fiber Artist Journey in your post, either with a link or button-use the direct link to the specific post - not just your main blog website (this helps with your search engine position.)   If you have buttons on your sidebar that works great, please just at least mention something in your post, for example "I'm linking to Fiber Artist Journey, see my sidebar for their button."  If you need help on how to add your link, read this.
  • Please take the time to visit other links, everyone loves new visitors and comments!  Try to comment on at least two other blogs in the party.
If you would like to add a button to your blog you can copy the code which is below my buttons and add it as a gadget on the layout page of your blog. Here is a tutorial on how to do it.


Other Great Blogs to Link Up with and Check Out!

Leah Day's Freemotion Quilting Project

Nina Marie Sayre's Art Quilt Blog

Confessions of a Fabric Addict

Balzar Designs - Art Journal Every Day

Richard and Tanya Quilts

Quilt Matters

Sew Many Ways

Tuesday, May 14, 2013

La Conner Quilt Museum New Collection of Antique Quilts

As a special supporter (or "Stashfest Friend") of the La Conner Quilt and Textile Museum, I was honored to attend a tea this afternoon.  A lovely group of supporters, board members, and quilt aficionados enjoyed getting to know each other a little bit and were the first to see a new collection of antique quilts that the museum recently acquired. Here are a few which I thought you might enjoy!
This pattern called "pickle jar" is pretty intricate and the colors are so vibrant.  Hard to believe that this incredible quilt dates back to 1910!

This 1932 "bluework" quilt is exquisite.  The patterns were so different from anything I've seen from that era. The part I was most surprised with was how the quilter used a dense field of French Knots to create the filling/dark shading of the cross.

Here is part of the area filled with French Knots.

Here's a close-up of some of the incredible embroidered blocks.


This log cabin block quilt from 1865 is particularly unique because it's a two-sided quilt... quite unusual for that time period.

 Here's the back side of the log cabin quilt.
This incredible piece has feathered triangles and appliquéd flowers and leaves as a large wide border. It's in pristine condition... for a quilt that will be celebrating two centuries in a few decades.  It was made in the 1840s.


 Here's another piece from the 1840's.  What makes this quilt special is that it is a very early example for broderie perce. This technique is done by cutting out a part of a printed fabric and appliquéing it onto a background, such as the center piece you see here.  The fabric was also used to make the large diamond shape border around the quilt.

The full 1840 broderie perce quilt.

This cherry quilt from the 1890's is Mennonite.


 A wonderful and unique example of redwork from the 1890's.

Hope you enjoy this step back in history.  It's amazing to see what was done so many years ago... how women expressed their artistic selves, even when it wasn't considered art.

I'm staying up on Whidbey Island for the rest of the week, while I attend my first session of the Level Two series in hand and machine stitch and design at the Gail Harker Center for Creative Arts.  I'll do my best to keep up with what all I'm working on this week, 

Friday, May 10, 2013

Exhibition Struggles and Design Wall Weekend #6

This is being a tough month.  It's not like I didn't expect it... but here I am in the midst of it and I'm feeling a little in overwhelm.

First, as most of you know, I'm share the head of exhibitions for the Contemporary QuiltArt Association and we have our "Salsa!" exhibit opening Memorial day weekend.  Our jury met on April 28 at my home... you'd think that once the pieces were picked out, it should be smooth sailing, right?  Wrong.

One of the wonderful things about the venue we're going to be in, the Mighty Tieton Warehouse Gallery, is that they're going to print a catalog of the exhibit. So, as soon as I know the juror selections, I needed to get the photos of accepted pieces to their printer, which meant I had to download 114 photos (a full and detail shot of each piece) from the place where the artists had submitted them.  However, I soon found out that not every artist had sent high-resolution photos.  This meant I had to contact those artists who had sent low-res photos and help them get high resolution ones to me.  I even ended up taking photos for one artist!

Once the photos were sent over, I had to start working on compiling all the information for the catalog... artist's statements, sizes of artwork, materials and techniques used, photographer, price of piece, year completed, as well as artist and title of the piece.  We have 57 pieces in the show, so that's quite a bit of info to put together.

On Saturday, we pick up the pieces at our CQA meeting.  We're working on figuring out a way to best hang the works... the gallery has a wire hanging system.  At this point, we're planning on using a heavy-duty fishing line to attach the quilts and art cloth from the wire.  However, we will need to tie the fishing line onto all the hanging sticks and haven't fully worked out how we will adjust the length of the fishing line to make sure each piece is at the right level and even.  My husband and I have even gone to a couple hardware stores to try and see if there was some sort of hardware that we could put the line through and pull it and it would catch and not slip.  At this point, it looks like we're going to just be adjusting it by hand and tying it off.

On the 20th, we head over to Tieton (about a 2 and a half hour drive) to hang the show.  I'm not sure how long it will take considering the tying aspect.  Then our Opening will be on Saturday the 25th, so another long drive that day (I may stay overnight for that one since it goes from 12-5 and there is an artist celebratory dinner afterwards!)

Oh, did I forget to mention that my two-year long program at the Gail Harker Center for the Creative Arts starts this month too?  I will be going up to La Conner from May 14-19 for my first class. We'll be meeting approximately every three months and have a good deal of homework in between each session.  However, as you can see from the photos here, Gail's student's create some amazing fiber artwork!

All this said, I've decided to back off of my initial goal this year to create a 5 x 7 piece each week.  I'm a little disappointed, but I am working on my artwork daily, so I suppose that's the real goal.  Since I'll be staying up at our cabin on Whidbey Island next week while I go to classes in La Conner, I plan to bring my freemotion quilting sampler quilt that I'm working on for Leah Day's Craftsy class to work on in the evening.  Having six days away from my husband and kids to just work on my art will be a real vacation!

Speaking of Leah's Craftsy class, she has just released "Freemotion Fillers Volume 2."  In celebration, if you go to her blog, you can click a link to get 50% off any of her three Craftsy classes (click here to get the page with the 50% off)!

OK, let's get going with Design Wall Weekend:

Design Wall Weekend #6 -- What do You Have on Your Design Wall?

What kind of blogs should link up?

I think that it's best to have content that matches the content and interests served with the blog that's hosting the party, so please only link up if your blog post is about any of the following:
  • Quilting and fabrics 
  • Fiber art of any kind
  • Hand & machine stitch or embroidery
  • Mixed media art
  • Book-making, art journals, and sketchbooks
  • Tutorials for any quilting, fiber, mixed media, sketchbook and other arts
  • These can be works in progress or finishes
Anna's hummingbird from my sketchbook - Acryllic paint, watercolor pencil, silver ink

Rules for the blog linking party

  • Mention Fiber Artist Journey in your post, either with a link or button-use the direct link to the specific post - not just your main blog website (this helps with your search engine position.)   If you have buttons on your sidebar that works great, please just at least mention something in your post, for example "I'm linking to Fiber Artist Journey, see my sidebar for their button."  If you need help on how to add your link, read this.
  • Please take the time to visit other links, everyone loves new visitors and comments!  Try to comment on at least two other blogs in the party.
If you would like to add a button to your blog you can copy the code which is below my buttons and add it as a gadget on the layout page of your blog. Here is a tutorial on how to do it.


Other Great Blogs to Link Up with and Check Out!

Nina Marie Sayre's Art Quilt Blog

Confessions of a Fabric Addict

Balzar Designs - Art Journal Every Day

Richard and Tanya Quilts

Quilt Matters

Sew Many Ways

Thursday, March 21, 2013

More Procion MX Dyeing

Wow... another fantastic day of mostly working with Procion MX dyeing at the Gail Harker Center for Creative Studies.  To be completely honest, I'm pretty tired... this can be hard work.  So, I'm going to keep it short and sweet tonight, and just put up some images and descriptions of the processes and projects we worked on.

First, our hand-dyed embroidery threads are totally luscious!  Here they are drying in our classroom.  We had to rinse them out and then set the color in hot water with Synthropol today.

We then started dyeing wool-rayon felt, which we'd cut into pieces prior to class, and will be making into hand-stitched books.

Felt with dye poured on (wet)
The felt totally soaks up the dye... you have to pour it on and it looks horrible and dark for the most part.

Rinsing out the felt
After allowing it to sit for a few hours, we rinsed it out and also set the dye with Synthropol.  Since the felt soaks up so much water, we had to carefully wrap it in towels to help dry it.  You don't want to press or agitate it very much, or it starts the felting process.  We then left it to completely dry overnight.

Felt dyeing


Rinsed felt for hand-made stitch books, laid out to dry


We also worked with painting dyes on sketchbook pages.  We do these in 2-page "spreads" so that they will go together when the book is opened.  We then fuse pages together, to make the pages stiff and able to be stitched on.  We started working on a few pages by drawing a design on them, then punching holes through the paper with a darning needle.  We then can easily put our stitches through the holes.


Some sketchbook pages painted with dye
I believe we're done with the dyeing now... on to more stitchwork tomorrow!


A two-page spread for a sketchbook, painted with Procion MX dye
  You Might Also Be Interested in:


New 5 x 7 
Challenge Pieces
Complex Threads 2 Developing the 
Creative Habit

Check out these other Great Blogs!
For great ideas on freemotion quilting, check out Leah Day's FreeMotion Quilting Project

Wednesday, March 20, 2013

Dyeing to Embroider

I spent the day literally dyeing to embroider... yes, I am anxiously awaiting getting down to stitching, but I mean "dyeing" with an "e" in it.  Rather than using all commercially available embroidery floss, we spent the day making our own threads, for the first of 5 days in "Experimental Hand Stitch" at the Gail Harker Center for the Creative Arts in LaConner, WA.  I've always salivated at the yummy colors of hand-dyed threads.  Now I know how to make them!

First, we had to prepare the skeins of thread.  There are two main types of embroidery thread, pearl (or perle in French) cotton which is a twisted cotton and cotton floss (also known as 6-stranded cotton.)  Pearl cotton comes in many different thicknesses: 3, 5, 8, 12, and 16, with 3 being the thickest and 16 being quite delicate.  Six-stranded cotton is literally that, 6 strands that you can separate, depending upon how thick a piece you want for your project.  Of course there are many other types of threads or yarns you can use for embroidery and any natural fiber will work for dyeing (silk, rayon, bamboo, etc.)  We have several unusual yarns and threads as well as the pearl cotton and cotton floss.

To prepare for dyeing, we had to get the thread into skeins (some of it came on balls or rolls that we had to wind into a skein) and then tie the skeins about every 12 inches (30 cm), to make sure it wouldn't get tangled up.  We used a figure 8 tie with a square knot, tight enough to hold the skein in place, but not so tight that it would cause a resist and have the thread not take up the dye underneath the tie.

As with any Procion MX dyeing, we then soaked our threads in a soda ash solution, so that the chemical bond would occur in the fiber when the dye  is introduced.

The next step was to use a syringe to "paint" the colors on the thread.  As you inject the dye onto the thread, you then need to smoosh it down to ensure that it is completely saturated, particularly wherever the ties are.    I chose to mainly go with an analogous color scheme from yellow-green, to green, to blue-green, to blue, to blue-violet, to violet.  With sticking to one color scheme, I can be assured that my projects using these dyed threads will go together.


When all the dye is on the threads, you carefully roll the threads up in plastic (see red arrow) and then leave it overnight to process.  I can't wait to see them in the morning!

My Mom, Nan Lopis, working
on her dyed threads
The best thing of all... my Mom has joined me for the 5 day class at Gail Harker's!  I was concerned that the dyeing might not be something she'd enjoy (she'll love the hand-stitching), but she came through like a champ, and made a lovely yellow-olive-greens colorway of threads.

Note: all the threads in the photos above have wet dye on them.  The colors will change somewhat upon the dye setting and washing them afterwards.  One of my favorite parts of dyeing is when you unwrap it the next day and wash it out... it's like getting a present!


You Might Also Be Interested in:

Making Fabric More Embroidery Samples How to Make a 
Knotted Blanket Stitch 
Video Tutorial

Tuesday, March 19, 2013

Dyeing, Stenciling & Making Marks on Fabric

I spent a little time this past weekend preparing some more fabrics to sell at Stashfest, as a donation to both the La Conner Quilt and Textile Museum and the Contemporary QuiltArt Association.  These pieces were mostly started at our CQA meeting playdate, where we got together to create fabrics for this fun event.

 This first piece was one that I made with a variety of techniques and materials.  It is approximately 1 yard square of raw silk.  I started with doing different stencil images using fabric marking pens.  From there, I added some bits of Shiva Oil Paintsticks, with a rubbing plate.  The final step was to overdye it with Dye-Na_flow.


It's a little easier to see the detail in a close-up shot.


 This lovely piece was created by one of the  other members of CQA, using Shiva Oil Paintsticks and a rubbing plate.  I love how she overlapped the designs, giving it a "spirograph" effect.  I brought it home from the playday, ironed it to set the oil paint, and then overdyed it.  The darker stripes of the fuscia dye that I used are created by bunching the fabric when it is drying.  You'd think the darker would be in the gullys between areas that are bunched higher up, but instead, the dye actually travels up to the higher areas.


This piece is also harder to appreciate without the detailed photo, but it's really fantastic!  Again, another CQA member did the surface design and then I overdyed and ironed to set the colors.  This was made with a thermofax silkscreen, which created the brown lines.  Some of these were overlapped, making the darker brown sections.

In the detail photo below, you can see the block prints and shiva paintstick rubbings that also decorate this piece.  About a yard square, this is made of white cotton, which I've then dyed.

This final photo is of four roughly fat-quarters of raw silk, which I've dyed in various green shades.  If I have time, I'll probably add more surface design to them as well.  

Speaking of time... I'm off to a 5 day class in the morning at Gail Harker's Center for the Creative Arts.  I'm finishing up the 100 level certificate classes this week (with Experimental Hand Stitch) and will be going on to the 200 level coursework starting in May.  That series will take about 2 years to complete, with classes every 3 months (and lots of homework in between!) If you're interested in seeing the kind of work that comes from Gail's students, check out my posts on her student's exhibition, Complex Threads.  I'll update you on how the class is going this week!


You Might Also Be Interested In:

CQA Surface Design Party Viewing for Inspiration Complex Threads 1

Wednesday, March 13, 2013

Progress on 2013 Goals

It's hard to believe that we're almost at the middle of March... almost 1/4 of the year is done!  However, with that in mind today, I thought I should review and see how I'm doing on My Goals for the year.

"Best Friends" by Christina Fairley Erickson
Commercial and artist hand-painted cottons, machine applique, machine free-motion quilting
My first goal is to work on finding and defining my artistic voice.  I've outlined several steps to help myself with this.  First, is to work with Gail Harker, of the Gail Harker Center for the Creative Arts.  You might recall some of my previous posts about the fantastic exhibit, Complex Threads, which featured the work of students of Gail.  I'm set for this part of my goal, starting next week when I'll be taking her Experimental Hand Stitch 101 course. This course will complete my 100 level series classes, and I'll be continuing on the path starting in May with Studies in Design and Experimental Hand and Machine Stitch 201 which will meet approximately every 3 months through the end of 2014.  

"Best Friends" detail by Christina Fairley Erickson
Next, I decided to kick up my production to help with defining my artistic voice.  To do this, I've been making my weekly 5 x 7 Challenge piece.  So far, I'm keeping up with this (one week I didn't finish, but then did two in another week.)  I also wanted to do my small art quilt group's challenge every other month.  I've only got a couple weeks to go to finish this and I'm not sure that I'm going to make this one.  The theme of the current Fiber Funster Challenge is "Waiting."  while I have designed a piece, I haven't even started it in production.  Maybe I can get it going this weekend.

Finally, I planned to document my progress in my blog, which I've been doing.  This also has helped me with my second major goal, which is to ramp up my pictorial quilts.  I feel like I've made a lot of progress through the weekly production of 5 x 7 pieces, both with my technical skills and composition.  I do still need to start working on a plan for creating a body of work.  

My third goal has to do with studio organization.  Here I have made some progress, but not enough to be proud of... I am at least working in my studio almost daily, rather than my studio being such a disaster area that I end up pulling my work out into other areas of the house!

My next goals, opening an Etsy shop and working towards a solo show in 2015 are still in the thought process, although I have looked through Etsy and think I can stay on track to open by mid 2013.  Beyond that, I'm on track for completing my piece for the Salsa show (entry due in mid-April).  I haven't yet decided upon my second medium-to-large sized piece to create, although I may go back to my roots and make another horse-themed quilt.  I won a first place (and cash prize!) at an equine art-show two years ago and just received the call for entry for this coming summer. Alternatively, I may shoot for finishing one of my works in progress, such as my Waterfall quilt or Cathedral Visions.  

I'm scratching the final goal, completing a driftwood art sculpture in time to enter in the May show.  Although I love the driftwood art, I'm not having the time to do it as well as my main love, fiber.  

Well, I'm in a bit of overwhelm now, with all that I need to do.  Guess it's time to get back to sewing!