Pages

Thursday, March 28, 2013

Waiting- the Fiber Funster's Challenge

Waiting by Charo Lopez
My small art-quilt group, the Fiber Funsters, met yesterday with our every-other month challenge.  We take turns choosing a theme.  This time, Charo picked "Waiting" for us to interpret.  Charo's piece, left, features her cat gazing out the window at little birds and bugs made from beads, buttons, and embroidery.  The pillow her kitty sits on is puffy and with little braid and tassels.


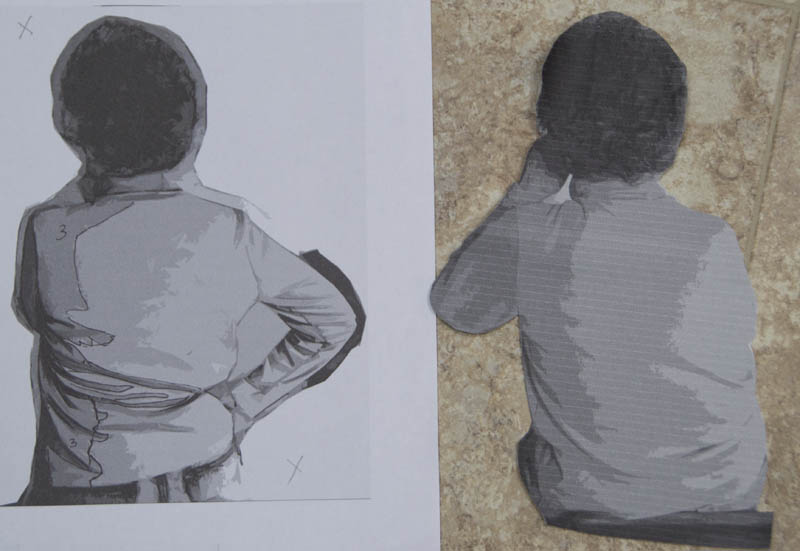
Allison Chang's "Waiting" (work in progress)
Allison started with white fabric and she wrote "Waiting" in Chinese characters across it.  She then fused shapes in a metallic gold, red, green, and black.  The squares and plaids contrasted with the circles, spirals, and dramatic red diagonal slashes made for active composition.  She also has put three half spheres of beaded wool felted roving.


Carolyn Hitter posed for several photos for her quilt
Carolyn started with having her husband, Jim, take some photos of her contemplating something from behind.  Using a method she learned in Leni Levenson Wiener's "Photo-Inspired Art Quilts: From Composition to Finished Piece", Carolyn took the photos and applied a Cutout Filter in Adobe Photoshop Elements.  She then chose the photo she liked the best (on the far left) and traced the shapes (below.)  The background of Carolyn's quilt is made from a fuzzy interfacing... just like on a design wall!  Her title says it all: "Waiting for Inspiration"
"Waiting for Inspiration" by Carolyn Hitter


Any of us who are mothers can relate to the sense of waiting that goes along with pregnancy.  Waiting to get pregnant, to find out whether you'll have a son or a daughter, to make sure they're healthy, and finally for the wonderous day when you meet your child.  Lise's humourous spin on these aspects of pregnancy is whimsical with the pink (for girls) and blue (for boys) background that the pollywog shaped sperm are swimming through.  
"Waiting" by Lise Vandandaigue
Similarly, Debbie has a beautiful pair of thread-painted birds waiting over their nest filled with three eggs.  The background has a very delicate soft changes of color with light blue and lavender squares pieced by fusing.  


My piece is still a work-in-progress.  After missing a flight out of Paris one year, I had to wait for 9 hours for the next flight.  Pretty tough when you're by yourself and already time-lagged.  Of course, it's nothing compared to those who have been stuck in an airport for days due to whether or other problems... my heart always goes out to them.  I'm adding freemotion quilting for shading will continue for background 
"Waiting" by Christina Fairley Erickson (work in progress)
 You Might Also Be Interested in:

Fiber Funster's Group 
Reveal- Celebration
"Opening" - The
Fiber Funsters
The Fiber Funsters 
Group Challenge


Here's some other great blogs to check out:

Leah Day's FreeMotion Quilting Project

Confessions of a Fabric Addict

Nina Marie Sayre's Art Quilt Blog

Never to Hot to Stitch

Monday, March 25, 2013

Five Days of Stitch Heaven

Christina standing below hand-dyed
embroidery threads
I'm back from five days in "stitch heaven" with Gail Harker.  The class, "Experimental Hand Stitch" focuses on Procion MX dyeing of embroidery thread and a wool/acrylic felt to stitch on, and then learning some of the basic embroidery stitches and how to use them in a contemporary context.

My friends", Debbie and Rebecca, dyed felts and threads


The felt and threads are vibrant and beautiful.  Gail feels that having your materials inspire you is important, so she helps her students understand their color choices and combinations to be successful with the dyeing process.

Some of my dyed felts and threads
I basically stuck with an analogous color scheme from yellow-green through red-violet.  If you're unfamiliar with analogous color schemes, it means that you pick colors that are adjacent to each other on the color wheel.  So the colors I worked with were greens, blues, and violets.

After our dyeing days, we started doing small stitch samplers.  Each stitch will have its own page in a small stitch book (we even learned how to bind our books!)  We also worked on documenting our samples within a sketchbook, including what threads we used, any observations we have, needles that were chosen, etc.

Thursday, March 21, 2013

More Procion MX Dyeing

Wow... another fantastic day of mostly working with Procion MX dyeing at the Gail Harker Center for Creative Studies.  To be completely honest, I'm pretty tired... this can be hard work.  So, I'm going to keep it short and sweet tonight, and just put up some images and descriptions of the processes and projects we worked on.

First, our hand-dyed embroidery threads are totally luscious!  Here they are drying in our classroom.  We had to rinse them out and then set the color in hot water with Synthropol today.

We then started dyeing wool-rayon felt, which we'd cut into pieces prior to class, and will be making into hand-stitched books.

Felt with dye poured on (wet)
The felt totally soaks up the dye... you have to pour it on and it looks horrible and dark for the most part.

Rinsing out the felt
After allowing it to sit for a few hours, we rinsed it out and also set the dye with Synthropol.  Since the felt soaks up so much water, we had to carefully wrap it in towels to help dry it.  You don't want to press or agitate it very much, or it starts the felting process.  We then left it to completely dry overnight.

Felt dyeing


Rinsed felt for hand-made stitch books, laid out to dry


We also worked with painting dyes on sketchbook pages.  We do these in 2-page "spreads" so that they will go together when the book is opened.  We then fuse pages together, to make the pages stiff and able to be stitched on.  We started working on a few pages by drawing a design on them, then punching holes through the paper with a darning needle.  We then can easily put our stitches through the holes.


Some sketchbook pages painted with dye
I believe we're done with the dyeing now... on to more stitchwork tomorrow!


A two-page spread for a sketchbook, painted with Procion MX dye
  You Might Also Be Interested in:


New 5 x 7 
Challenge Pieces
Complex Threads 2 Developing the 
Creative Habit

Check out these other Great Blogs!
For great ideas on freemotion quilting, check out Leah Day's FreeMotion Quilting Project

Wednesday, March 20, 2013

Dyeing to Embroider

I spent the day literally dyeing to embroider... yes, I am anxiously awaiting getting down to stitching, but I mean "dyeing" with an "e" in it.  Rather than using all commercially available embroidery floss, we spent the day making our own threads, for the first of 5 days in "Experimental Hand Stitch" at the Gail Harker Center for the Creative Arts in LaConner, WA.  I've always salivated at the yummy colors of hand-dyed threads.  Now I know how to make them!

First, we had to prepare the skeins of thread.  There are two main types of embroidery thread, pearl (or perle in French) cotton which is a twisted cotton and cotton floss (also known as 6-stranded cotton.)  Pearl cotton comes in many different thicknesses: 3, 5, 8, 12, and 16, with 3 being the thickest and 16 being quite delicate.  Six-stranded cotton is literally that, 6 strands that you can separate, depending upon how thick a piece you want for your project.  Of course there are many other types of threads or yarns you can use for embroidery and any natural fiber will work for dyeing (silk, rayon, bamboo, etc.)  We have several unusual yarns and threads as well as the pearl cotton and cotton floss.

To prepare for dyeing, we had to get the thread into skeins (some of it came on balls or rolls that we had to wind into a skein) and then tie the skeins about every 12 inches (30 cm), to make sure it wouldn't get tangled up.  We used a figure 8 tie with a square knot, tight enough to hold the skein in place, but not so tight that it would cause a resist and have the thread not take up the dye underneath the tie.

As with any Procion MX dyeing, we then soaked our threads in a soda ash solution, so that the chemical bond would occur in the fiber when the dye  is introduced.

The next step was to use a syringe to "paint" the colors on the thread.  As you inject the dye onto the thread, you then need to smoosh it down to ensure that it is completely saturated, particularly wherever the ties are.    I chose to mainly go with an analogous color scheme from yellow-green, to green, to blue-green, to blue, to blue-violet, to violet.  With sticking to one color scheme, I can be assured that my projects using these dyed threads will go together.


When all the dye is on the threads, you carefully roll the threads up in plastic (see red arrow) and then leave it overnight to process.  I can't wait to see them in the morning!

My Mom, Nan Lopis, working
on her dyed threads
The best thing of all... my Mom has joined me for the 5 day class at Gail Harker's!  I was concerned that the dyeing might not be something she'd enjoy (she'll love the hand-stitching), but she came through like a champ, and made a lovely yellow-olive-greens colorway of threads.

Note: all the threads in the photos above have wet dye on them.  The colors will change somewhat upon the dye setting and washing them afterwards.  One of my favorite parts of dyeing is when you unwrap it the next day and wash it out... it's like getting a present!


You Might Also Be Interested in:

Making Fabric More Embroidery Samples How to Make a 
Knotted Blanket Stitch 
Video Tutorial

Tuesday, March 19, 2013

Dyeing, Stenciling & Making Marks on Fabric

I spent a little time this past weekend preparing some more fabrics to sell at Stashfest, as a donation to both the La Conner Quilt and Textile Museum and the Contemporary QuiltArt Association.  These pieces were mostly started at our CQA meeting playdate, where we got together to create fabrics for this fun event.

 This first piece was one that I made with a variety of techniques and materials.  It is approximately 1 yard square of raw silk.  I started with doing different stencil images using fabric marking pens.  From there, I added some bits of Shiva Oil Paintsticks, with a rubbing plate.  The final step was to overdye it with Dye-Na_flow.


It's a little easier to see the detail in a close-up shot.


 This lovely piece was created by one of the  other members of CQA, using Shiva Oil Paintsticks and a rubbing plate.  I love how she overlapped the designs, giving it a "spirograph" effect.  I brought it home from the playday, ironed it to set the oil paint, and then overdyed it.  The darker stripes of the fuscia dye that I used are created by bunching the fabric when it is drying.  You'd think the darker would be in the gullys between areas that are bunched higher up, but instead, the dye actually travels up to the higher areas.


This piece is also harder to appreciate without the detailed photo, but it's really fantastic!  Again, another CQA member did the surface design and then I overdyed and ironed to set the colors.  This was made with a thermofax silkscreen, which created the brown lines.  Some of these were overlapped, making the darker brown sections.

In the detail photo below, you can see the block prints and shiva paintstick rubbings that also decorate this piece.  About a yard square, this is made of white cotton, which I've then dyed.

This final photo is of four roughly fat-quarters of raw silk, which I've dyed in various green shades.  If I have time, I'll probably add more surface design to them as well.  

Speaking of time... I'm off to a 5 day class in the morning at Gail Harker's Center for the Creative Arts.  I'm finishing up the 100 level certificate classes this week (with Experimental Hand Stitch) and will be going on to the 200 level coursework starting in May.  That series will take about 2 years to complete, with classes every 3 months (and lots of homework in between!) If you're interested in seeing the kind of work that comes from Gail's students, check out my posts on her student's exhibition, Complex Threads.  I'll update you on how the class is going this week!


You Might Also Be Interested In:

CQA Surface Design Party Viewing for Inspiration Complex Threads 1

Monday, March 18, 2013

And the Winner is...

"Corn" by Christina Fairley Erickson
Machine Freehand Embroidery, decorative stitching, freemotion quilting
Red!  Thanks for all the comments, encouragement and opinions on the background for my corn piece.  The little ends of the corn husk were challenging to applique down, but you can see a bit of the organza husk standing up in the picture.  What you can't really tell from the photo is how much the trapunto stands out.  The two longer corn rows have 5 extra layers of batting, making them stand about 3/4" up from the backing. I cut each of the batting layers a little smaller than the last, so it really has a rounded look.  The lower ear of corn has less trapunto (3 layers), since it is behind the others.


I'm now working on my last piece, chili peppers.  I started with the green stems, then went on to the darker shadowed portions of the chili.

The difficult part of these is that they are so thin, it will be difficult to convey a 3-D effect or to trapunto them.  So I tried to sew both in the long/horizontal direction and also around the width of each chili, to convey the roundness of each.

One of the main things when doing thread painting is to keep on layering your colors to add more dimension and gradation.  If you just fill in one color butted up to the next, it will look flat and like a paint-by-number painting.  Blending the colors is very important.  Also, look for the unexpected colors.  In this chili, I found a small place where the shadow had just a touch of lavender... it adds a lot to the finished piece to have those little bits that your eye might not originally catch.

Finished "Chili" thread painting
Now I just need to do the background and then I'll be on to putting all 9 of my Salsa blocks together!


You Might Also Be Interested in:

Corn - Red or Orange- 
You Vote!
Piquant Progress Fitting My Challenge 
with Showing


Please check out these other great blogs:

FreeMotion by the River by Connie Kresin

Quilt Story

Friday, March 15, 2013

Corn-- Red or Orange- You Vote!

Well, I'm down to needed to pick out the background and do the freemotion quilting on my latest Salsa block- Corn.  I'm not sure about the background color, however.  Do you prefer the red or the orange?
This may have been the most difficult of my salsa pieces to date.  Trying to get individual kernels of corn was tricky.  I also wanted to have the husk seem more realistic, which I may work on a bit more.

Nylon organza pieces painted with Dye-na-Flow
I started thinking about the husk and how to make it seem like it could be peeled away.  I decided to use a painted nylon organza, which you could get layers of sheer that would build color.  I used Jacquard Dye-na-Flow to paint it, mixing a variety of greens and yellows.

Nylon organza hanging to dry
When you paint the nylon organza, do it on a thin plastic sheet and wait until it is just starting to dry (it will be semi-sticky to the plastic.)  Then, peel it up and hang it to dry with clothes-pins or paperclips to a line.  If you leave it on the plastic, much of the paint will stay on the plastic and the surface of the organza gets a shiny odd texture to it.

After painting my organza, it was time to get going with the thread painting.  Starting with a photo I'd printed on fabric, I began with the very lightest color first.  Much of these pieces were sewn in little circles, to imitate the shape of the corn kernels.  At some places it was more appropriate to make little scallops, to add highlighting or shadowing to the kernels.


I then layered on color after color of a range from pale beige through sunshine yellow to a dark mustard.  In between the rows, oranges predominated to add shadowing... even a touch of a pinkish-orange.


At the end, I added more of the sunshine and lighter colors again, to build up layers and make the kernels a little more dimensional, with the highlights sticking out.

Corn with thread-painting over all, including husk

After the corn itself was complete, I thread-painted the husk.  I'm not completely sure about my process here or whether I need to do more (or even take away some of what I did.  After the thread painting, I laid some of the organza which I had painted on top and stitched it down.  I didn't stitch it entirely over the husk areas, as I wanted some of the pieces to be able to fold back and move in a breeze, like a real husk would do.  After sewing it down, I cut around the edge of my sewing.

Completed corn with the organza husk
So, what do you think?  Red or Orange for the background?

By the way, as many of you know, I'm a big fan of Leah Day's FreeMotion Quilting project.  If you're looking to gain skill in freemotion quilting, Leah has just come out with a new class on Craftsy.  If you go to her blog, you can click a link and get the class for half price!  ($19.99 rather than 39.99.)

You Might Also Be Interested in:


A Slice of Lime Peppers and Avocado Cilantro - Si!


Make sure to check out these other great blogs!

Confessions of a Fabric Addict

Great post on stenciling and thermofax on Nina Marie Sayre's Art Quilts