Pages

Showing posts with label quilting video. Show all posts

Sunday, April 7, 2013

True Triangles - Video Tutorial

Working on sample of True Triangles
I've had some wonderful comments on my Salsa blocks, as well as a few questions on how I did certain aspects, including my background of my most recent block, Chili Pepper.  Today, I'm going to go over the triangles freemotion quilting design. 


Practice and notes from my sketchbook - True Triangles


I started working out this triangle design in my sketchbook, because I wanted a way to have triangles, but not a bunch of connecting lines or other angles.
More notes from my sketchbook
The main trick with this design is to make your first triangle and then backtrack (or "travel stitch" as Leah Day of the Freemotion Quilting Project calls it) to the middle of one of the sides of your triangle, where you start the first corner of your next triangle.

Difficulty: Beginner- The main difficulty with this design is in getting your sides of your triangles straight and in carefully backtracking, so your stitches stay on the line of the original triangle's line.

OK, I'm still working out the bugs on how to do a nice job on videography for my tutorials, so bear with me.  I cut down time on this video by speeding it up a bit during part of the sewing, but I need a bit more practice on my hand position while videoing and also adding audio to the part which has increased speed.
Click Here if the Video isn't Showing Above

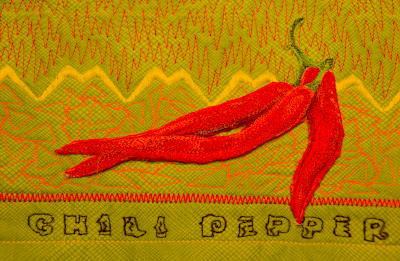
True Triangles used in the background of my Chili Pepper block
If you haven't linked up yet, make sure to visit Design Wall Weekend!  Or just stop by to find some other great blogs!

You Might Also Be Interested In:

Design Wall Weekend #1 Tutorial: Adding Your
Link to a Blog Party
Design Wall Weekends


I'm Linking up with:

Freemotion by the River

Quilt Story

Sunday, January 20, 2013

Curved Piecing Tutorial - Waterfall Quilt

Last week I promised to get back to my UFO "Waterfall Quilt."  Well, I've made some progress with it:
Waterfall Quilt last week
Waterfall Quilt this week


One of the waterfall squares with
curved piecing
As you can see, I've added a couple rows (and I obviously need to get a larger design wall that my pieces can stick to!)  More importantly, I think, is that I removed pieces that I felt didn't really work, either due to the patterning of the material, or more likely, the color flow wasn't right.  Actually, now that I look at the photograph, I see a few other pieces that I'll probably switch out, since they don't have quite the right value. I call this my waterfall quilt as I wanted the curved pieces to make it feel like water trickling down, as well as the blues and greens to represent the water and surrounding forest.

I thought you might like to find out how I do the curved inserts which I'm working on adding to all the blocks. Believe it or not, it's a fairly simple process.  Certainly simpler than doing the video... so please excuse me if my videography needs a little perfecting!


For other interesting blogs and tutorials:

Check out how other quilters are finishing up their UFO's on Leah Day's Freemotion Quilting Project

Carol's portrait of Max, a yellow lab shows a great progression for doing a pictorial quilt.

You might also be interested in:

Fresh Poppy Design
Week 2 of the 5 x 7 
Artist Challenge
Fireworks Freemotion 
Quilting Design
How to Make a 
Knotted Blanket Stitch
Quilt Story's Block 
Tutorial Links