Pages

Saturday, April 27, 2013

The Creative World Book Arts - 1

First, if you're looking for the Design Wall Weekend blog party, click here!
"The Red Necklace" by Barbara Barnes Allen
Mixed media (book art) $175

As I've mentioned in the past, my mother is a librarian.  I grew up surrounded by and delighting in books.  She started reading to me early and I carried on the tradition with my children.  Even after she retired from her job as a school librarian, she took on and continues to serve as a librarian for the retirement community where she lives.  So it's not surprising that I'm fascinated with book arts.

The idea of combining three of my most favorite things- books, textiles and art- delights me.  I do work on art journals, although I haven't spent a lot of time combining textile into them yet, I'm sure I will in the future.  And, although I haven't yet forayed into making my own paper, it is something I'd like to play with in the future (being yet another type of fiber!)

Today I went to a fabulous exhibit  at the Schack Center for the Arts in Everett, WA, called "The Creative World of Book Arts."  I hope you'll enjoy seeing some of these wonderful pieces!
Display of Barbara Barnes Allen's wonderful handmade books (foreground)
at the Schack Art Center


 "Marilyn" by Lisa JonesMoore (from side)
Metal, photos, paper, mixed media NFS

 "Marilyn" by Lisa JonesMoore (front)
Metal, photos, paper, mixed media NFS

 "Marilyn" by Lisa JonesMoore (back)
Metal, photos, paper, mixed media NFS
There was an entire wall of these large sculptural pieces (generally 2-4 feet in diameter) which I thought must have been a different exhibit... from afar they looked like wood carved into rounds like a cross-section of a tree.  I was sure surprised when I moved in for a closer look!
Sculpture by Ellen Jane Michael made of books

Sculpture by Ellen Jane Michael made of books

Close-up of side of book Sculpture by
 Ellen Jane Michael 
I'll share more of these (and perhaps some of my art journals) soon!

You Might Also Be Interested in:


My Little Stitch Book & 
100th Post Anniversary
Trees as Fiber Art Design Wall Weekends


Thursday, April 25, 2013

100th Post Anniversary & Design Wall Weekend #4

Whoo-Hoo!  Today is my 100th published post!

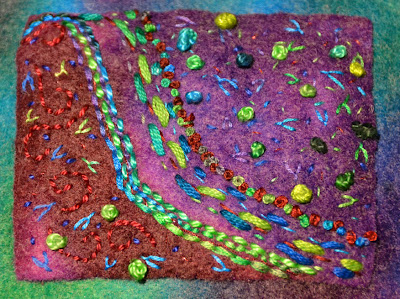
Little Stitch book by Christina Fairley Erickson
Hand-dyed wool/acrylic felt, hand stitched with hand-dyed and
commercial pearl cotton, embroidery floss and yarn
This week, I've been working mainly on finishing up some little hand-stitch samples which I'm making into books.  It's a bit different from my typical heavily machine stitched and freemotion quilted pieces, but they've been fun and relaxing.  Here is my first book I've completed:

I'm still a little unhappy with my binding, but I think it may just require more practice to get it right.  Since this was my first time to actually complete a hand-made book, I'm pretty happy with it.


Binding of my book


Stitch sampler on cover- Running Stitch, Back Stitch,
French Knots, Seed Stitch, and Fly Stitch
Running or Straight Stitch Sampler

Back Stitch Sampler
Seed Stitch Sampler
French Knot Sampler

Fly Stitch Sampler
Now to some fun with Design Wall Weekend!

Design Wall Weekend #4 -- What do You Have on Your Design Wall?

What kind of blogs should link up?

I think that it's best to have content that matches the content and interests served with the blog that's hosting the party, so please only link up if your blog post is about any of the following:
  • Quilting and fabrics 
  • Fiber art of any kind
  • Hand & machine stitch or embroidery
  • Mixed media art
  • Book-making, art journals, and sketchbooks
  • Tutorials for any quilting, fiber, mixed media, sketchbook and other arts
  • These can be works in progress or finishes

Rules for the blog linking party

  • If you follow my blog, I'll follow yours!  PLEASE make sure to comment and tell me you're following, and I'll visit and  follow yours too.)
  • Please take the time to visit other links, everyone loves new visitors and comments!  Try to comment on at least two other blogs in the party.
If you would like to add a button to your blog you can copy the code which is below my buttons and add it as a gadget on the layout page of your blog. Here is a tutorial on how to do it.

You Might Also Be Interested In:


Dyeing to Embroider; Five Days in Stitch Heaven Hand Stitch Variations


Other Great Blogs to Link Up with and Check Out!

The FreeMotion Quilting Project

Confessions of a Fabric Addict

Nina Marie Sayre's Art Quilt Blog

What a Hoot Quilts

Simplicity versus Exuberance

I love looking at different fiber artist's work.  Even when it's very different from my personal style or taste, I generally find things I like about most pieces.  The couple I want to share with you tonight are also from the Whidbey Island Surface Design Association's recent exhibit up at the Schack Art Center in Everett, WA.

First, Janet Steadman displayed a stimulating series with bright stripes of color, even sweeps of quilting stitches, and a simplicity that made it all come together.  The series displayed together really works well... it makes me think of a library filled with books stacked to the ceiling. (I am a daughter of a librarian, so my house can look like this too!)

Janet Steadman's series "Keepers"
Fiber $375 each (set of six $2100)

Close-up of one of Janet Steadman's
"Keepers"
"Exuberance" by Fine Gelfand
Cotton & syntetic fabrics, fused & machine stitched $650
In contrast to Janet's style, Fine Gelfand's piece is a study in busy-ness.  The patterns and textures feel as though they are moving- spinning right off the piece.  Again, the colors are quite vivid and there is a sense of being somewhat like a traditional quilt, but you get a much different feel from this piece.    The name of this piece, "Exuberance" really says it all.

Detail of "Exuberance" by Fine Gelfand
Hope to have you join me for "Design Wall Weekend" blog linking party Friday-Sunday!

You Might Also Be Interested In:

Tuesday, April 23, 2013

Beginning to Exhibit- Tips to Manage Showing


I've been a bit over my head in preparing for the Salsa Exhibition that's coming up next month.  I'll be hosting the Contemporary QuiltArt Association jury at my house this coming weekend, to go through all the slides of entries and make decisions about the show.  Furthermore, I've been contacted by three other venues (two which I'd sent information to and one that was unsolicited) about potential shows for our group in the future.  More on these when I get them scheduled!

For those of you interested in showing, I have a bunch of management tools I've made to help me.  You might want to think about how you can incorporate similar tools to help yourself organize for exhibitions.

  • I have a spreadsheet of all my quilts/art with their sizes, descriptions, the materials and techniques used on each, completion date, any awards or prizes it has won, the price, and whether there are dates that it is committed to be at an exhibition.
  • I have a page of links to all the places I go to find potential exhibitions
  • I have templates for the labels that I make for my quilts (which I print on fabric) so they have a consistent look.
  • I have a list of the shows I am interested in showing at, have sent submissions to, and where I have work currently showing.  This includes links to the call to artists, the contact person and address, entry dates, when the quilt is due, the show run dates, and when the quilt is expected to be returned by.
  • I even have a database of my library of fiber and art books (OK, this may be overboard, but I was raised by a librarian!)

"Rhapsody in Blue" by Ilene Rae Sorenson
Hard Core Kumihimo braiding, satin cord, mixed
yarns, wooden dowels, wire, wood frame $2400.
I think you probably get the drift.  I guess one of the challenges for me is to not get so caught up in making systems that I don't actually spend my time in the studio.  But, you can see that if you have multiple pieces going to various shows, making sure to track all this information can be critical.

Here's another wonderful piece from the Whidbey Island Surface Design Association's show.  This striking piece by Ilene Rae Sorenson is using a traditional Japanese braiding technique.  She collaborated with a local woodworker to design and build a specialized table for the braiding process.  
"Rhapsody in Blue" detail


I'm always thrilled to see a different type of fiber art... particularly those which mix the traditional with contemporary.  Although the monochromatic color scheme has very little light colors, there is enough differences in value and particularly texture to give a great deal of contrast, creating interest.  The long vertical cords create repetition and the curly ends crossing the columns breaks it up, creating movement.  I think this piece is very successful and beautiful.

I'm getting back to my 5 x 7 challenge this week... I'll have something to share soon.


You Might Also Be Interested In:
Complex Threads 1 "Journeys" Show 
at SeaTac Airport
Designing for a Theme

Friday, April 19, 2013

Salsa Complete! and Design Wall Weekend #3

"Salsa" by Christina Fairley Erickson
Freehand Machine Embroidery, decorative stitching, freemotion quilting, trapunto
Fiber Art exhibit at the Schack Art Center
It's been a tough week.  Of course, completing my "Salsa" quilt and getting it entered in the Contemporary QuiltArt Association's (CQA) show (of the same name... Salsa), is a big achievement.  But perhaps it's a bit of a let-down too... I've put so much effort into this piece I'm not quite sure where to go from here.  I apologize for being offline this week- between taxes being due, having lots of work to get ready for the jury process for the Salsa show, and feeling a bit under the weather a couple days, I just didn't get much time at the computer.  I'll work at doing better over the next week.

"Pray for the Forest II" by Larkin J. Van Horn
Fabric, beads  $750.
I did get to a wonderful fiber art show of artists from the Whidbey Island branch of the Surface Design Association earlier this month at Schack Art Center in Everett.  Here are a couple of the wonderful pieces exhibited there.


"Compare and Contrast" by Liz Axford
3 layers silk organza- front and back layers
are screen-printed multiple times, hand-stitched
with cotton floss to reveal patterning $6500.


Design Wall Weekend #3 -- What do You Have on Your Design Wall?

What kind of blogs should link up?

I think that it's best to have content that matches the content and interests served with the blog that's hosting the party, so please only link up if your blog post is about any of the following:
  • Quilting and fabrics 
  • Fiber art of any kind
  • Hand & machine stitch or embroidery
  • Mixed media art
  • Book-making, art journals, and sketchbooks
  • Tutorials for any quilting, fiber, mixed media, sketchbook and other arts
  • These can be works in progress or finishes

Rules for the blog linking party

  • If you follow my blog, I'll follow yours!  PLEASE make sure to comment and tell me you're following, and I'll visit and  follow yours too.)
  • Please take the time to visit other links, everyone loves new visitors and comments!  Try to comment on at least two other blogs in the party.
If you would like to add a button to your blog you can copy the code which is below my buttons and add it as a gadget on the layout page of your blog. Here is a tutorial on how to do it.


You Might Also Be Interested in:


Tutorial- Sashing 
Pre-Quilted Blocks
True Triangles 
Video Tutorial
Fireworks Freemotion 
Quilting Design


Check Out These Other Great Blogs!

Nina Marie Sayre Art Quilts

Leah Day's Freemotion Quilting Project

Confessions of a Fabric Addict

Quilt Matters

Richard and Tanya Quilts

Friday, April 12, 2013

Freemotion Quilting Sampler & Design Wall Weekend #2

Salsa quilt with "Here Comes the Sun"
freemotion quilting design
My Salsa quilt is almost finished... I only have 3 sides of the sashing/border to quilt and the binding to go... good thing since the show deadline is tomorrow!  After trying several different styles of freemotion quilting for the sashing (as well as thread color), I decided to let the fabric be my guide and created what I'm calling the "Here Comes the Sun" freemotion quilting design.  I'll work on getting a tutorial out on this design later this week.
Closeup of the sashing fabric
which inspired the design


Layout of my quilt-top for a free-motion quilting sampler
that I currently have on my design wall


I've also finally got started on piecing my quilt top together that I'll be using for a freemotion quilting sampler.  I'm enrolled in Leah Day's Craftsy class "Freemotion Fillers Volume 1" which teaches 50 different freemotion quilting designs (49 blocks each with their own design and 1 design throughout the sashing and border.)  I'm thinking, however, of substituting some of the designs that Leah teaches in the class with some of my own, such as my True Triangles design.  Make sure to check out the True Triangles Video Tutorial here!


So, what do you have on your design wall?   By the way, if you don't yet have your own design wall, click here for a great tutorial on how to make one for yourself from Quilts by Jen.   I'm looking forward to seeing all sorts of inspiring blogs for our  blog party link up!


What kind of blogs should link up?

I think that it's best to have content that matches the content and interests served with the blog that's hosting the party, so please only link up if your blog post is about any of the following:
  • Quilting and fabrics 
  • Fiber art of any kind
  • Hand & machine stitch or embroidery
  • Mixed media art
  • Book-making, art journals, and sketchbooks
  • Tutorials for any quilting, fiber, mixed media, sketchbook and other arts
  • These can be works in progress or finishes

Rules for the blog linking party

  • If you follow my blog, I'll follow yours!  PLEASE make sure to comment and tell me you're following, and I'll visit and  follow yours too.)
  • Please take the time to visit other links, everyone loves new visitors and comments!  Try to comment on at least two other blogs in the party.
If you would like to add a button to your blog you can copy the code which is below my buttons and add it as a gadget on the layout page of your blog. Here is a tutorial on how to do it.


You Might Also Be Interested in:


Tutorial- Sashing 
Pre-Quilted Blocks
True Triangles 
Video Tutorial
Fireworks Freemotion Quilting Design


Check Out These Other Great Blogs!

Nina Marie Sayre Art Quilts

Leah Day's Freemotion Quilting Project

Confessions of a Fabric Addict

Quilt Matters

Richard and Tanya Quilts


Tuesday, April 9, 2013

Sashing Pre-Quilted Blocks - Tutorial

Adding backing strips with edges ironed under over batting, which
has been whip stitched to block seam allowances
I've never made a "quilt-as-you-go" quilt before. This piece, however, was my attempt to both satisfy my personal challenge to complete a 5 x 7 art piece each week along with preparing a piece to enter in the Contemporary QuiltArt Association's upcoming "Salsa!" Show.

I have to admit I'm a bit behind on my weekly 5x7's, but putting together the Salsa quilt, as well as some other projects, have taken priority for me right now.  I'll be getting back to my    5 x 7's soon enough.

Front side of my Salsa quilt with sashing
So, now that I have all my blocks done, how do I put it all together without having a problem of differing amounts of layers in the sashing versus the blocks?  The way I solved this puzzle is to start with making the sashing and puting the front side all together.

Then, I turned it over and carefully cut pieces of batting to fit right between the blocks seam allowances, so that the batting would be consistently uniform across the quilt.  I chose to do the vertical pieces between the blocks, then the long horizontal strips, and afterwards the vertical borders.

Batting cut and added between blocks vertically
After cutting all the batting to size, I did a long whip-stitch to hold the batting in place while I will be freemotion quilting the sashing.  I then cut pieces of the backing fabric about 3/4" wider than the finished width of the sashing and pressed under the edges of these strips with my steam iron.

Batting Whip-stitched to seam allowance of blocks
Next, I carefully hand-stitched down the strips over the batting and seam allowances of the blocks.

While this might not be the most expedient (or fast) method, I think the outcome will be quite nice.  Next step is going to be freemotion quilting the sashing/borders!


Batting added other than vertical border; backing
strips added to vertical centers


Backing strips all added and ready to hand-stitch


You Might Also Be Interested in:

Honoring the Traditional in 
Contemporary Quilt Pieces
Outdoor Fiber Art 
& Call for Entry
Fitting My Challenge
with Showing