Pages

Sunday, April 7, 2013

True Triangles - Video Tutorial

Working on sample of True Triangles
I've had some wonderful comments on my Salsa blocks, as well as a few questions on how I did certain aspects, including my background of my most recent block, Chili Pepper.  Today, I'm going to go over the triangles freemotion quilting design. 


Practice and notes from my sketchbook - True Triangles


I started working out this triangle design in my sketchbook, because I wanted a way to have triangles, but not a bunch of connecting lines or other angles.
More notes from my sketchbook
The main trick with this design is to make your first triangle and then backtrack (or "travel stitch" as Leah Day of the Freemotion Quilting Project calls it) to the middle of one of the sides of your triangle, where you start the first corner of your next triangle.

Difficulty: Beginner- The main difficulty with this design is in getting your sides of your triangles straight and in carefully backtracking, so your stitches stay on the line of the original triangle's line.

OK, I'm still working out the bugs on how to do a nice job on videography for my tutorials, so bear with me.  I cut down time on this video by speeding it up a bit during part of the sewing, but I need a bit more practice on my hand position while videoing and also adding audio to the part which has increased speed.

Click Here if the Video isn't Showing Above

True Triangles used in the background of my Chili Pepper block
If you haven't linked up yet, make sure to visit Design Wall Weekend!  Or just stop by to find some other great blogs!

You Might Also Be Interested In:

Design Wall Weekend #1 Tutorial: Adding Your
Link to a Blog Party
Design Wall Weekends


I'm Linking up with:

Freemotion by the River

Quilt Story

Saturday, April 6, 2013

Design Wall Weekend #1

Christina's Salsa quilt (in progress)
I don't know about you, but I generally have too much on my design wall... and sometimes the things that are up aren't what I'm currently working on!  Not only am I working on finishing up my Salsa Quilt, I have my Waterfall colorplay quilt, my little "Waiting" piece, and fabric to start a piece for the Outdoor "Salsa in the Sun" show.  I guess if they're up on my wall, I don't really count them as a UFO... which implies that you've sort of given up on it.

By the way, I'm just finishing up my tutorial on "True Triangles", the freemotion quilting design which I've created for the Chili Pepper block.  Check back on Sunday (April 7) to see the video tutorial!

So, what do you have on your design wall?   By the way, if you don't yet have your own design wall, click here for a great tutorial on how to make one for yourself from Quilts by Jen.   I'm looking forward to seeing all sorts of inspiring blogs for our kick-off blog party link up!

What kind of blogs should link up?

I think that it's best to have content that matches the content and interests served with the blog that's hosting the party, so please only link up if your blog post is about any of the following:
  • Quilting and fabrics 
  • Fiber art of any kind
  • Hand & machine stitch or embroidery
  • Mixed media art
  • Book-making, art journals, and sketchbooks
  • Tutorials for any quilting, fiber, mixed media, sketchbook and other arts
  • These can be works in progress or finishes

Rules for the blog linking party

  • If you follow my blog, I'll follow yours!  PLEASE make sure to comment and tell me you're following, and I'll visit and  follow yours too.)
  • Please take the time to visit other links, everyone loves new visitors and comments!  Try to comment on at least two other blogs in the party.
If you would like to add a button to your blog you can copy the code which is below my buttons and add it as a gadget on the layout page of your blog. Here is a tutorial on how to do it.


Other Great Blogs To Check Out:

Sara's Creative Jewish Mom's Crafting Weekend - wonderful crochet projects!

Sew Many Ways

Thursday, April 4, 2013

How to Use Your Design Wall

Years back, I never used a design wall.  I might sketch out a design on graph paper or in my sketchbook, but then I pretty much just went with it and constructed as close to what I'd drawn as I could.  It certainly is possible to get a good result from that... but it's kind of hit or miss.  It's much more effective to use a design wall.

Your design wall can simply be a piece of batting that you pin up on a wall anywhere you have some space to step back from it (preferably at least 8-12 feet or 3-4 meters) and be able to look at your design as it progresses.


First try- lower left seems a bit heavy with the
dark backgrounds
The change for me came when I started taking a Design series - classes for quilters that taught you the basic fundamentals of design.  Our teacher always said "Make visual decisions Visually."  In other words, you have to actually look at something to see if it's going to work, rather than just thinking it will work.

Tonight it was time to put my Salsa blocks all together.  So, up they went on the design wall.  I arranged them, then stepped back and took a look (and a picture).

I then rearranged them several times, each time checking to see how I liked the arrangement.
I like having the two red backgrounds on opposite corners

Looking through a reducing glass or at a photograph can also help you get a sense of how well the design will work from afar.

After determining the placement of the blocks, I then had to decide which fabic I was going to use for the sashing.  To do this, I pinned different pieces of fabric up and put the blocks on top, stepped back and looked at the overall effect.

The green fabric to the right is bold and seemed like a good prospect, but when I tried out the black with red/yellow/orange batik, I think I found a winner!
Salsa blocks with sashing complete
Next step will adding batting/backing and freemotion quilting of the sashing.

Make sure to check back this weekend for our first Design Wall Weekend Blog Link-up Party!


You Might Also Be Interested In:

Tutorial: Add a Button 
on Your Blog
Tutorial: Adding Your
Link to a Blog Party
Design Wall Weekends


One of the best places to learn FreeMotion Quilting: Leah Day's FreeMotion Quilting Project

Tuesday, April 2, 2013

Coming on Saturday- Design Wall Weekends Link Party!

I've decided to open a "Design Wall Weekend" link party each week for Fiber and Mixed Media of all sorts.    You might notice a couple new tutorials I just posted to help out anyone who is interested in participating in the link party.
"Waiting for Inspiration" by Carolyn Hitter
I think that it's best to have content that matches the content and interests served with the blog that's hosting the party, so blogs that will be featured will have and emphasis on the following:
  • Quilting and fabrics 
  • Fiber art of any kind
  • Hand & machine stitch or embroidery
  • Mixed media art
  • Book-making, art journals, and sketchbooks
  • Tutorials for any quilting, fiber, mixed media, sketchbook and other arts
  • These can be works in progress or finishes
So, if you're a blogger, make sure and check in on Saturday or Sunday and post your blog.  If you're just interested as a reader, you'll find a whole lot of additional diverse, fun and interesting content during the weekends!


You Might Also Be Interested In:

Tutorial: Add a Button 
on Your Blog
Tutorial: Adding Your
Link to a Blog Party
Design Wall Weekends


Tutorial: Adding a Button to Your Blog

This Tutorial is for "Adding a Button to Your Blog" using Blogger.com.

When you find a button that you'd like to add that has the code included underneath the button, copy the code (highlight it and click Control-C or Command-C.)  You can use my "Design Wall Weekend" button on the right.

Open your Blogger interface and click "Layout."

Your layout (below) can be modified in the Template Designer, but at this point, let's focus on adding the button.  Look over your existing layout.  You should see several "Add a Gadget" links.  Choose where on your page you'd like to have the button and click the "Add a Gadget" link.


A new window with a list of options (gadgets) that you can add to your blog appears.  Scroll down the list until you get to the HTML/Javascript option and click it.


Now you just need to name your button and paste in the code which you have copied for the button:


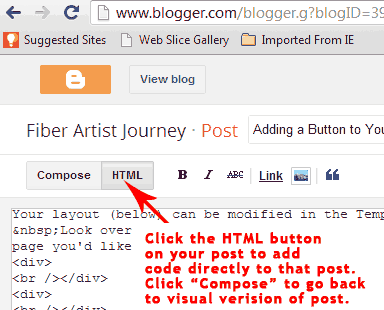
If you don't want the button to show up on all your posts, you can just add the code in to your post.  To do this, click the HTML button at the top of the screen where you are writing your post.  Determine where you want the button and Paste the code into the HTML.  Then, click the "Compose" button to return to the visual version of creating your post.

You Might Also Be Interested In:
How to Post a Link 
for a Blog Link Party
Developing the
Creative Habit
Designing for a Theme- 
Innovation Part 2


Tutorial: Adding Your Link to a Blog Linking Party

First of all, it's important to understand WHY? you'd want to have a link from another blog to yours.  The obvious main reason is to get more people aware of your blog and reading it.  But beyond the additional people that will come directly from one blog to the other, you'll also get more traffic from search engines like Google.  One way that search engines determine your ranking (how far up on their pages your site turns up) is whether you have other websites linking to your page.  By having reciprocal links (where you link to my page and I link back to yours), your search engine ranking will increase, helping you get more traffic from people searching for content like you have on your blog.  It's also important to fill out the Post Settings of "Labels" and "Search Description" for each of your posts.
Blogger.com's Post design allows you to add labels and a search description for every post

Now, here is the process to add your blog's link to a linking party (I'm using inLinkz.com's software, but most are very similar):


  1. Get your specific link to the post you want new viewer's to see.  To do this, click on the title of the post you'd like featured to go to that specific post's page.  Highlight the web address (URL) in the address bar and right click to get the drop-down menu.  Choose "Copy" (or use Ctrl-C or Command-C to copy it.)
  1. Go to the "Add your link" button. This opens up three fields that you need to fill
    (1) This is the URL to your post which you can copy and paste from your browser
    (2) The name or description that will show up under your link
    (3) Your email. This is only known to the owner of the link-up and it is not visible to anyone else
    .
inLinkz tool step 1 for adding your blog to the blog party list

  1. Add your post's web address to line 1- URL by clicking inside the box and either right-click and use the dropdown Paste or use Ctrl-V or Command-V to paste it.  Then fill in your name and email address and click the "Next Step" button.
    Paste your specific post's URL or website address 
  2. You have 3 different options for adding an image: picking one from your blog's post, giving a direct image URL, or uploading an image from your computer.    With picking an image from your blog, you will see a "Select" and a "Crop" button under each image.  If you choose "Select", your image will automatically be converted to a square thumbnail and proceed to link-up.  Personally, I prefer to choose how my images are cropped, so I recommend choosing "Crop".
  3. You then can take and drag the corners of the the square to increase or decrease the cropped image, or move the square to position the square over the part of the image you want to show.  When it's right the way you like it, click "Crop the selected area."


    You will then have the option to tweet or post to facebook about your link.  Clicking on "Tweet" or "Share on facebook" will pop up a window to let you take action. InLinkz will first let you choose your text to post and then tweet or cancel. The default text on twitter mentions both your blog and the target blog.   You also have the option to "Skip this step" (3) if you do not want to tweet about your link.  

Alternately, rather than using an image from your blog post, you can choose "Upload from Computer" and then click "Choose File."  This will then open a window which shows your files on your computer.  Navigate to the file you want and click "Open"  After the file name shows next to the "Choose File button," click "Upload."

Any questions?  Just post a comment and I'll get back to you a.s.a.p.

You Might Also Be Interested In:
Tutorial: Add a Button 
on Your Blog
2013 Artist 5 x 7 Challenge The Fiber Funsters 
Group Challenge


Monday, April 1, 2013

Red Hot Chili Peppers!

"Chili Pepper" by Christina Fairley Erickson
Freehand machine embroidery with decorative stitching and freemotion quilting
Make sure to check out the start of my Design Wall Weekends Blog Link Party coming Saturday April 6!

Well, I finally finished up my final 5 x 7" block for the Salsa Quilt.  I had some fun with this and will be posting a couple of tutorials later this week for both how to do unusual lettering and a new freemotion quilting design.  I also will work on documenting my process for installing new fonts onto your computer, so you can play around with different lettering styles like this "Taco Modern" font I use in each of my salsa blocks.

I've been super busy this last week catching up after being gone for 5 days in the "Experimental Hand Stitch class."  I've been working on continuing to complete my hand-stitch samples, which are quite relaxing to do.  I've also started cutting and piecing a new practice quilt, which I'm doing along with Leah Day's Craftsy class.  Although I'm pretty comfortable with freemotion machine quilting, the more you practice, the better you get.  The one thing I haven't completely decided upon is whether I'm going to do all the fillers which Leah suggests in her class, or whether I'll pick and choose those which I want to do.  I'm not 100% thrilled with every design she's picked, so I may just substitute some of my own, or others I've learned from Leah's blog.

One thing that's going to be a little different in the future is that I will be hosting a "Design Wall Weekend" blog linking party.  This will be open to quilters, fiber artists, mixed media artists, and book/art journalists who have blogs to help increase exposure to all sorts of great ideas.

Now, it's on to do the sashing and binding for this quilt.  Not to mention, I will need to get going on a new 5 x 7 Challenge piece for next week!  So check back for tutorials later this week and I hope you will have some fun quilting this week.

You Might Also Be Interested in:

And the Winner Is... A Slice of Lime Peppers and Avocado


Check out these other great blogs:

Freshly Pieced

Freemotion by the River

Quilt Story